Once you have created and configured a Tag, you’ll want to use it somewhere! There are many ways you can use an Inspirometer Tag – you can add them to your emails, your website, physical documents, digital documents, beer mats, the wall of your building…

In this section we’ll go over how to actually get your tags, and how to put them into your work. Alternatively, click here to download our guide: ‘Downloading and using Tags‘
Tags come in two basic types – the digital type (for clicking on) and the real-world type (for scanning). You can download tags of whichever kind you like!
First of all, you’ll need to choose which Tag you want to download (you may have multiple Tags in your list). Go to ‘List Tags’ to display all of the tags that are associated with your account. Pick the Tag you want by finding it’s name in the ‘Title’ column, and then click the the green ‘download’ symbol beside your Tag.

This is your Tag Download page. From here, you can download your Tag in whichever forms you require.
Find out how to get and use each of the Tag types in the following sections.
Click a heading below to show/hide relevant help. PDFs are also available.
Get/Use Faces Tags (for emails, pdfs, electronic documents etc.)
It is designed to be clicked on and can be used in many kinds of digital documents, including emails and PDFs.
To see what the experience of giving a rating is like, click here (opens new tab).
On the Tag Download page, you will need to select ‘BASIC TAGS’ and then below that, select ‘FACES’ (these will probably be selected by default, actually).
Click COPY and the Tag Information will be copied to your clipboard – ready to be ‘pasted’ somewhere.
(Please note: Some security and browser settings prevent the “COPY” button from working effectively. If you encounter this issue, simply drag your cursor over the Faces to select them, and then use Ctrl-C to copy them to your clipboard and paste them as normal.)
If you would like your Faces Tag to display in your email signature, for example, you just need to open up your email signature editor screen and right-click to paste in the Faces.
If your respondents are not in an English speaking country, and you wish the Tag to work in the local language, you can set this for the Tag you are downloading via the language dropdown (which can be seen in the image above).
The set and selectable items on the response page will then be rendered into that language based on (in many cases) translations provided by native-speaking human translators. Please note however, that it is not possible to automatically provide this service for the main question owing to the (almost) infinite range of options available.
For this reason, the main question will need to be translated into the local language when you type it in.
Get/Use Widget Tags (for web-pages, intranet pages, blogs etc.)
You can ask your users for feedback on the content or design of your site. This site, toolchest.org, has its own widget (in the footer!). Why not give it a try by rating us? The widget will automatically capture the URL for the page the respondent was viewing when they clicked their response, and this allows the website designers to easily identify which content is best engaging its audience.
To get the widget, Go to the Tag Download page and select ‘WIDGET’:
Click ‘COPY’ to copy the script, which you can then paste into your website’s html.
(Please note: Some security and browser settings prevent the “COPY” button from working effectively. If you encounter this issue, simply drag your cursor over the code to select it, and then use Ctrl-C to copy them to your clipboard and paste it as normal.)
If you use WordPress or another Content Management System, you will be able to simply paste this script into a text entry area. (In WordPress, you may have to view your posts/pages using the Text tab instead of the Visual tab, and then paste the widget script into the desired position.)
If you’re not sure how to enter HTML within your particular Content Management System (CMS), the best way to find out is to is to run a google search with the name of your web based tool or Content Management System, followed by ‘html’.
The widget is designed to blend well into your established site design, but in some circumstances you may want to alter certain features of it. There are a number of parameters to the widget, such as its size and how it works, which can be customised.
Changing the width
The widget displays at a default width, but this can be customised by making a slight change to the code within the <script> tags.
Before the first closing ‘>‘, just add the phrase: data-width=‘200’
(where 200 is an example number of pixels)
For example:
<script src=”http://dev.inspirometer.com/public/jsonp/tag.widget.js data-id=’YwJ3egkz’ data-width=’200′></script>
The minimum widget width is 150 pixels.
Changing the font size
You may also adjust the size of the font used in the Widget by adding the phrase: data-font-size=‘10’
Implementing comments
By default, clicking a face in the widget will record the response, and the faces will be replaced with a ‘Thank you for your feedback’ message.
However, it can also be configured to display a text-entry box right within the widget, and prompt for a comment. The user can then write and submit their comment without having to go anywhere outside your website.
To implement this, just add: data-comment=‘yes’ to the script, in the same way as before.
Here is an example Widget script featuring all three of these configurations:
<script src=’http://my.inspirometer.com/public/jsonp/tag.widget.js’ data-id=’bwDegKk3′ data-width=’240′ data-font-size=’12’ data-comment=’yes’></script>
Get/Use QRcode Tags (for printed matter, facilities, tangibles etc.)
QR (Quick Response) codes are our way of creating physical, real-world Tags! They can be rapidly scanned by a smartphone camera which then opens the related page.
QRcodes are increasingly becoming part of our everyday experience – you will find them on brochures, advertisements, tickets, all over the place. They are 2-dimensional barcodes containing useful information that can be read with the camera on your phone. There are a host of free apps that can read QRcodes.
To download the QRcode Tag, navigate to the Tag Download tab and select BASIC TABS followed by QR CODE:
The system will generate a QRcode image for you and invite you to ‘SAVE’ it. Inspirometer QRcode Tags are always surrounded by the Inspirometer border including a ‘Rate This’ prompt and our colourful brand – so that you always know they will link you to a fast one question response page.
When you click SAVE, the image will be downloaded in the .png format. Precisely how the download happens depends on your browser settings:
If you have downloaded things over the internet before, you are probably familiar with the way that your browser handles downloads. However, for those of us who are unused to downloading, the experience can be a little confusing – particularly when the browser simply saves the file in the background without asking where you would like it saved.
Each browser behaves slightly differently and so we would recommend that if you are having trouble with downloading your Tag, that you Google the name of your browser followed by the words: file download location. This will quickly find you advice on where to find your downloads, and how to change where they are saved.
If you continue to have problems, we suggest that you might benefit from a few minutes TLC from your friendly IT person – whoever that is. They will sort out any technical issues (if there are any) and show you the practical steps first-hand.
When the download finishes and you have located its location in your computer, you can continue on to adding it into a document/item that you want to print.
The QRcode is just an picture, so with most programs like word processors you can just ‘insert image’ as usual.
You could send your QRcode to a printers and have them print it onto your mug or your T-shirt.
Get/Use Text Tags (for social media, web-meetings, forums etc.)
The more sophisticated of them can, however, handle hyperlinked text and so, in a sort of ‘retro’ move, we have gone back to the IRC origins of emoticons to recreate our faces Tag in text form. This enables them to be copied and easily inserted into applications such as LinkedIn, and Lync, where respondents can then have their response immediately captured by the corresponding emoticon. Applications such as Facebook and Twitter do not support hyperlinked text, but they do allow you to include a Raw URL in your posts/tweets.
To obtain your Tag in this form, select ‘TEXT LINK’ on the download page, and then click the relevant radio button: Raw URL for Twitter, Facebook and Yammer, Emoticons for LinkedIn, Lync and many other discussion forums.

You may need to use trial and error to see what works for you (for instance, you can use hyperlinked emoticons in the Notes facility in Yammer and Facebook). Simply configure the Tag using the settings on the download page, copy it using the COPY button (or selecting and Ctrl-C if your security settings disable the COPY button) and paste it into your post. If the option you choose works for your preferred social media, you will see your cursor change as you hover over the links. If this is not the case, you will need to select different options.
The ‘#’ option is a numeric form of the emoticons (Rate this >> -2 -1 0 +1 +2 +X* ) which may be preferable in some situations. Where you are content to include a simple link to the rating page (without pre-choosing the score) you can enter your own custom text, which is hyperlinked with your basic Tag address.
Get/Use Special Tags (different sizes and styles)
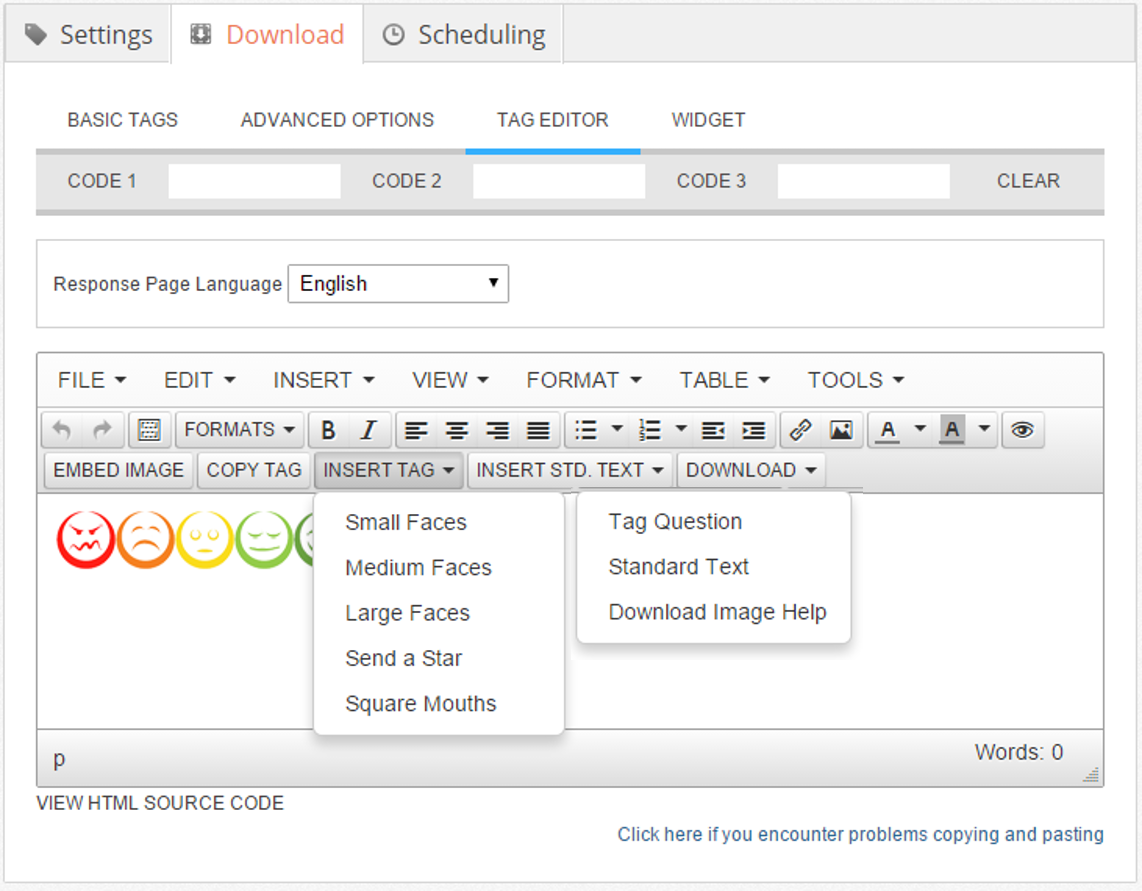
The Tag Editor enables you to replace your original Tag faces with ones of a different size and style. Simply delete the initial content of the editor panel (by selecting it and pressing the ‘Delete’ key on your keyboard) and begin to create your Tag from scratch by entering whatever text you want around it (INSERT STD. TEXT provides a shortcut to including the Tag question etc.) and including a set of faces at the relevant point (via INSERT TAG).
The editor is a fairly simple tool, so you may prefer to get the main content set up in the editor, and then copy it across to your own software to add the finishing touches.
Encoding Tags with additional information
This is particularly useful in preparing Tags for CRM or mailing software, where relevant field codes can be entered into CODE 1 to 3 and these are then updated from the database as emails are sent out. But the codes can also be used to differentiate between different applications for the same Tag – for instance in different email signatures, one Tag can be encoded “Internal” and another “External” (or any other form of differentiation you might require). Please note, when you encode a Tag, the ‘Anonymous’ message disappears from the response page since the Inspirometer system is unable to confirm that the information does not compromise that anonymity in some way.
A guide on encoding Tags for CRM or mailing software is available here.
Basic guidance on achieving the same thing from Outlook can be found below.
Using Encoded Tags within Outlook (Beta)
To use this feature, you will need to:
- Check that you are using Outlook 2010 or later (the addin does not work with earlier versions of Outlook).
- Download a copy of the addin (which is currently at a beta stage of development). You can download it here: Beta signature addin for Outlook
- Close Outlook and run the downloaded file, and click the prompts to agree the various steps.
- Reopen Outlook, and check that it is working okay. (Uninstall the addin if it is not, and then restart Outlook again).
- Go to the download page for your signature Tag in your Inspirometer account, click the advanced option, and encode your Tag as follows: Set code1 to {RX:TARGET} Set code2 to {RX:TIMESTAMP} Set code3 to {RX:SUBJECT} (including the curly brackets for each).
- Copy your Tag and paste it into your signature (or directly into your email).
- Check that it is working by sending yourself an email with a subject etc. and your newly encoded Tag in place. (Hover over the Tag before you send the email to see that the RX codes are present, and after you receive it to see that they have been replaced by the email data).
- If you hit problems with this, you may need to get some support from your friendly IT people to make sure everything is set up as it should be.
Please note. The response page will make no claims as the response being anonymous whenever codes are used. It is important that you review your own text around the Tag to ensure that your own claims for the Tag and/or the feedback are also accurate and appropriate.
Continue to Responding to Tags