Owner permissions at the root level of a compiler carry the capability of configuring special features within the Inspirometer. These special features largely concern the advanced options concerning community Tags.
Community Tags are a special form of Tag which can be created in the compiler such that they are available to everyone in the compiler. This is very useful for a number of reasons:
- It ensures that questions, and the manner in which the Tag works, are consistent for everybody
- It means that results can be more accurately combined, and therefore …
- It enables scores for the specific Tag to be seen all the way up through the organisation
- It is much easier to use within CRM systems, and other data-based approaches
- People’s Tags can be distributed automatically (or systematically) on their behalf
- It still allows individuals to see and take responsibility for their own personal results
Please note, some of the options listed below require customisation of your account to enable them. To access these options, please contact us.
Click a heading below to show/hide relevant help sections.
Creating a community Tag
Creating a community Tag
What are community Tags?
Community Tags are immensely powerful tools. They enable one person to create and configure a Tag which is immediately replicated in everybody’s account within the compiler. For this reason, only owners at the root of the compiler have the ability to create and edit community Tags (or in limited cases, owners of specially configured departments).
Community Tags are very useful wherever you require consistency in the feedback system, for instance in gathering customer feedback on a particular service, or in the case of a common culture change initiative. They ensure the same questions are asked of everybody, and they enable a more detailed oversight of the results. They also enable multiple individuals to get personal and individual feedback from a common CRM or data-based system while using simple codes.
How do you create a community Tag?
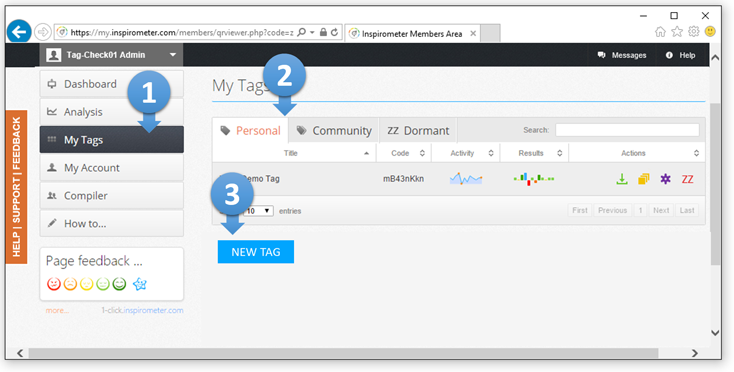
If you have permission to create community Tags, you can do so within your account by clicking My Tags in the left-hand menu (1), and then clicking the community tab (2) to view current community Tags. At the bottom of the list of current community Tags, click on the ‘NEW TAG’ button (3).
If this is missing in your account, you do not currently have permission to create a community Tag, and you will need to speak to someone who does. Clicking the ‘NEW TAG’ button will open up a dialogue box where you can enter a name for your community Tag (4). Please pick a meaningful name for your Tag, so that people will be able to work out what it is when they see it appear in their accounts. You can then type in the question that the Tag will pose (5) and click the ‘CREATE TAG’ button (6). This will take you to the Tag editing page for your community Tag, where you can set up follow-up questions and the ability to add comments etc.

Getting started
If you would like to start with some default settings for your Tag, and edit it from there, there are a number of templates available (7) which provide you with a standard question and set-up, and places you on the editing page so that you can adjust these to what you need.
For more information on editing Tag settings, go to the editing section of these help pages. Or for guidance on writing a good Tag question, see ‘How to write a good Tag question‘
Registering aliases to your Tag
Registering aliases to your Tag
Why might you need aliases?
Some CRM and data-based systems are limited in terms of the information that they can include as fields within emails and hyperlinks. For instance they may store a user-ID, but it may not be in a form that ties up with an individual’s name or email. This can present a problem when encoding Tags for CRM systems in terms of how you get the responses back to the individual who is responsible for the case and has provided the service.
Fortunately, Inspirometer has the capability of relating any unique sequence of characters to an individual’s account. You can capture the unique IDs that your CRM or data-based system uses to differentiate between its users, and record them against individual accounts. These special sets of characters which identify specific individuals are called aliases within the Inspirometer system. When such a registered alias is ‘hit’ in an encoded Tag, Inspirometer is then able to cross-reference the data and ensure that the feedback is routed to the correct owner.
How do you create aliases?
To add a new alias for an individual, open the Compiler section in the left-hand menu (1) and click on Account Management (1a), then go to the Accounts tab (2) and locate the person for whom you wish to add a new alias. Then simply click on the magnifying glass beside their record (3) and type in their new alias (4).

You can add more than one alias per person, but each alias must be unique so that there is no ambiguity over ownership. This method provides an easy way for line-managers and admins to keep abreast of personnel changes. However, if you have a bulk load of aliases to configure, Inspirometer does provide a premium service to do this for you – for pricing and timescales, please contact us.
What happens if an alias is missing?
In the event that new aliases are created by your CRM or data-based systems which are not updated within the Inspirometer system, any responses from these aliases will not be available to you through your dashboards or reports, since there is no way for Inspirometer to guess where to allocate the data. However, you will be able to see that the data is incomplete when you view the Compiler (1) Impact Reports (1a) from the left hand menu. The status panel (2) will identify that you are missing data and will list any unregistered aliases to which this data pertains.

How do you track down unregistered aliases?
Some CRM systems do not make it easy for your to identify to whom these user IDs may belong, and so you may need to do some detective work. If the CRM system is also encoding case IDs into the Tags, then it may be possible to trace the alias (user ID) back to the user by cross referencing the case ID. If encoded in this way, you can see which case IDs are connected to which aliases (user IDs) by downloading a csv export of the complete data. You can do this by opening the compiler section (1) of the left-hand menu, and then clicking on Compiler Export (1a).
 Put in the dates for which you want to export the data, and ensure you tick the ‘Include Unregistered Aliases’ checkbox (2) then click the ‘START’ button. This will add a new item to the list of downloads, which will begin ‘processing’. This may take some time (it is a batch process) so you may be best coming back to it after a few minutes. You will need to refresh the list to see if the processing has completed and the file is ‘Available’. If it is, you can download the file (3) and open it up in Excel.
Sort the file on column Y (4) to bring the records which have unregistered aliases to the top, and you can then look up the encoding for any case ID – which will probably be in columns D, E or F (5).
How can you avoid unregistered aliases?
It can be easy to overlook including aliases into Inspirometer as they change, and so it should be written into your induction or on-boarding processes. You can also set up an alert to warn you when your Inspirometer encounters an unregistered alias. Since aliases are community Tag specific, you will need to go to the relevant community Tag, via Tags in the left-hand menu (1). When you have found the correct community Tag, click on the gearwheel symbol beside it to access its settings, and then click on the ‘Compiler Options’ tab (2).

You will then be able to access the ‘Unregistered Alias Alerts’ section (3), and switch it on (4). Please ensure that you put in your email address (5) to receive the alerts, and save these settings (6).
Special use of Tag codes
Special use of Tag codes
Using codes to request user information
Codes are most commonly configured via the URL hyperlinks that are set into the tags. However it is sometimes useful to enable the respondent to set these codes directly, for instance in cases where the Tag applies to a generic interaction, but where the feedback is specific to one instance. An example of this may be where a writer has used one QR Tag for a catalogue, but wants to capture the number of the page to which the feedback relates. Another example may be a permanent Tag in a meeting room which enables people to record the type of meeting on which they are providing feedback.
While the comment field could capture this data, its free-form nature means that it provides no guidance, and it is difficult to separate any such specific data from any other comment given.
How codes can capture user information
The codes element of Inspirometer Tags provides the means for short simple fields to be incorporated into the Tag response page, along with a text prompt which can describe what is wanted, and a format control which can limit the input to a specific range of values or a drop-down list. Examples of this are shown below.

Before considering the use of these codes, please reflect on whether there may be an easier way to obtain or infer the information you require. Please consider that the essential value of Inspirometer lies in the respondents confidence that they can respond in a single click, and therefore use such codes sparingly, and in situations where respondents will be happy to engage.
How to configure the codes for user input
To set up the codes for user input, click on Tags in the left hand menu (1) and then select the Tag you want to use in the community Tag list, and click on the settings icon. When the setting page opens, click on the Compiler Options tab (2) and then on the Code item for the code you wish to configure (in this example we will assume this is Code 1).
To use the code for user input, you will need to set the status to ‘on’ (4) and then select whether you want the prompt to be arranged horizontally (input box beside prompt – see example A above) or vertically (input box below prompt – see example B above) (5).

The type setting (6) is used to restrict the types of input that will acceptable. These types are:
- Free Text: The user can type in what they wish in the same way as they can in the comment box.
- Drop Down: The users can only select from the options provided in a drop down list. (If this option is selected, the page changes so that you can type your list of options.)
- Numeric: Only numerical input is accepted.
- From URL: This presents the information that has been encoded into the URL, and enables the user to remove it if they wish (so that the response is anonymised*).
The instruction text is the prompt which will appear beside or above the input box on the response page (7). Please remember to save the result (8) before you test it out, using the TEST button at the bottom of the page (you will need to scroll down to see this).
Restricting multiple responses via encoding
Community Tags are most often encoded via the sending CRM system, and in this they can be encoded in the same manner as non-community Tags (see the encoding item in the section on Download/Use Tags). However, community Tags can be set to limit responses based on these encoded values.
The code used to restrict input is Code 2, based on whether the value for Code 2 is unique within the database for that Tag. For instance, to limit the response to one per case ID, or to limit responses from a particular user to one per week.
To restrict multiple responses in this way, click on Tags in the left hand menu (1) and then select the Tag to which this applies in the community Tag list, and click on the settings icon. When the setting page opens, click on the Compiler Options tab (2) and then on the Multiple Responses item (3). Here you can allow or disallow any duplicates of Code 2, or prevent duplicates within a certain period of time (4). Remember to save your settings when you have finished.

This option is primarily for preventing ‘over-enthusiastic’ respondents from biasing the result, for instance in the case of employee engagement feedback where you may be looking for one response per employee per month. It can be used to avoid ‘ballot box stuffing’ but there are simpler options for this.
Tracking community Tags
Tracking community Tags
How can you track Tags?
If your compiler has been set up for tracking, you can include a tracking pixel into your Tags at download.
Tracking is only enabled for community Tags which are included in emails. It is a mechanism by which you can see (if your responent allows it) whether your email has been opened by the respondent, and whether it wàs clicked, but please be aware that the system setup is quite involved and, because of the constraints concerning email software, it is not foolproof. Because of these restrictions it is only available as a premium service to those organisations who have the technical ability to support tracking in-house.
What is a tracking pixel?
Tracking pixels are very small clear images which load over the internet. By encoding the image refererence to match the Tag encoding, the Inspirometer system can link the image request generated when the email loads with the Tag that has been included for feedback. In this way it can determine response rates … the proportion of your email recipients who provide a response having seen the Tag.
How do I include a tracking pixel in my Tag?
Tracking pixels are included at the point of Tag download. Click on Tags in the left hand menu (1) to show the Tag list. Ensure you are looking at the community Tag list. Click on the green download icon beside the Tag you wish to track, or click on the download tab (2) if you are already on the settings page for the Tag concerned. Then simply tick the check-box for ‘Insert Tracking Pixel’ (3).
![]()
Because tracking pixels are almost entirely used in conjunction with CRM systems, you will probably need to download the Tag in HTML format so that it can be edited into the CRM template. To do this, click on the ‘View HTML’ button, highlight the source code by dragging your cursor, and then copy the higlighted code using right-click> copy or the ctrl-c shortcut. You can then work with your CRM expert to ensure that it is edited and placed correctly to achieve what you require.
Changing how the Tag loads
Changing how the Tag loads
Why do we want to adjust loading format?
By default, if the feedback is clear at the point the Tag is ‘clicked’ (for instance where someone clicks a specific face in a document) the response page loads in the standard format shown on the left (A) below with the slider set under the relevant face. At this point, many respondents simply close the page, and it is this ease of use that ensures a high response rate. This ‘single-click’ approach is fine when the response is positive, but when the response is negative it misses out any information about what precisely made the interaction unsatisfactory from the respondents perspective.

In these situations it may be useful to emphasise a desire for more input, but without compromising the respondents right not to give it – for instance using a response page format more like the one on the right (B).
How do we adjust response page loading format?
To change the response page loading format in the case of negative responses, click on Tags in the left hand menu (1) and then select the relevant Tag in the community Tag list, and click on the settings icon. When the setting page opens, click on the Compiler Options tab (2) and then on the Loading format item (3). Here it is a simple choice as to which circumstances you want the emphasised comment (illustrated in B above) to be displayed (4).

Respecting the choice of the respondent
Depending on which option is selected, this more inquisitional format can be set to arise on a red face, a red or orange face, or a red or orange or yellow face. It does not always solicit a comment, but it makes it much more likely that a comment is given, and equally importantly it recognises the right of the respondent to ‘not answer’, and thereby preserves the sense of ease in responding and the maximisation of response rate.
The fact is that whatever you do, you cannot stop people exiting a web page, and it is bad practice to try. Web browsers, rightly, maintain the rights of the individual and take a dim view of web pages which try to spam users or undermine their security.
Helping the respondent appreciate the consequences of their choice
 There is however one other legitimate option for soliciting a comment. If a respondent clicks a red face, which is a serious indictment of the interaction, and if the respondent then ignores the emphasised comment box, and seeks to leave the page (having left no clue that could help you solve their issue), the page will throw up the warning on the right.
Enabling root-cause analysis
Enabling root-cause analysis
What do we mean by root cause analysis?
The intention behind the Inspirometer is premised on the idea of personal responsibility for performance improvement, and the structure of the tool is designed to inform and encourage that behaviour. However, where multiple people fulfil the same role, patterns in performance may be influenced by systematic effects which only become really noticeable by looking at patterns across multiple accounts. The root cause analysis feature is intended to make those patterns more visible, and to feed them back to the individuals best placed to resolve them.
The way it works is that people using the same community Tag to gather feedback on their service (for instance technical support) can review their responses, and provide feedback on the tools, information and support they utilised to provide that specific service (e.g. knowledge base, laptop, diagnostics). Over time, weaknesses in the primary service can be associated with the performance of the support system that contributed to that weakness, and priorities can be identified for improvement.
How do you set up root cause analysis?
Step 1 concerns developing a complete understanding of the key resources that your people are using to provide their service. Ask them, what resources do you rely on to provide your service effectively? Step 2 is to go to the providers of these resources; to ensure they have Tags set up to capture feedback on how well they support your people; and to make a note of the eight character codes for those Tags (these do not have to be community Tags). When you have done this, you can set up root cause analysis for your service Tag (which does need to be a community Tag).
To do this, click on Tags in the left hand menu (1) and then select the relevant Tag in the community Tag list, and click on the settings icon. When the setting page opens, click on the Root Cause tab (2) and create the number of items you need via the green ‘+’ button (3). For each item, give it a meaningful label that people will recognise as a resource they use in their work (4) and enter the eight character Tag code you noted in Step 2 (5). When you have finished, ensure you save the records you have created (6).

What does root cause analysis look like from the users viewpoint?
Users access your root cause analysis through their response analysis, which they get to through the Analysis section of the left hand menu (1) and clicking on the Response Analysis item (1a). This provides them with a list of their responses which they can sort and order as described in the response analysis section of this help guide.
Clicking on the fishbone (2) beside any particular response will take the user to the page where they can add their own narrative concerning the response (3) and also rate the various support resources in terms of how they impacted the result as indicated by the feedback received. To do this, they can simply scan down the list of resource labels (4) and click the smileys on the widgets that were most relevant to the outcome (5) – both positively and negatively. They do not have to click all widgets, but they should be advised to make sure that they reflect the resources performance in respect of that specific response, and not a general overview – there should be other means by which they can do that.

Scheduling community Tags
Scheduling community Tags
Why schedule a community Tag?
At present, community Tags can only be scheduled to be sent to their owners, which may not seem particularly useful. However, in situations where we are learning to change our behaviours, perhaps as a result of a training programme, or a cultural initiative, or a change workshop, periodic self-reflection on our personal progress can be a remarkably powerful tool in helping us to better assimilate the changes required. We have noticed that the simple act of reviewing progress at the end of a day, automatically refreshes intentions concerning the following day and more than doubles the effectiveness of personal commitments to change.
How do you schedule a community Tag?
To schedule a community Tag, click on Tags in the left hand menu (1) and then select the relevant Tag in the community Tag list, and click on the settings icon. When the setting page opens, click on the Scheduling tab (2) and then on the information bar (3).

This will open a pop-up dialogue box as shown below. Here you can enter the start time and date for the Tag schedule to begin (4), and decide for how long (or how may cycles) you want the schedule to last (5). At present, community Tag schedules can only be set up for Tags to be sent to their owners (6), but you can isolate the Tag sending to a particular part of the structure (7). Please note the check-box below the Department setting ‘Include Sub-Depts’ and remember to tick this if you want to capture everyone in a particular area.

The frequency of the Tag sending is set in the central panel (8), and you can edit the message that is sent with the Tag (9), and then save the schedule (10). When you do, it will look like the screen below. You can set more than one schedule for a community Tag.

Node-based community Tags
Departmental community Tags
In large organisations, the volume of community Tags extending through all accounts can become confusing, particularly when different areas of the business need community Tags which are specific to their work. In these situations we can provide a premium service to enable Department specific community Tags which do not extend to the rest of the organisation. If you need this service, please contact us.
Secured community Tags
Secured community Tags
In some situations you may need to restrict Tag responses to verifiable respondents, even in some cases to specific individuals. We provide a number of premium options which are able to limit responses to specific individuals or communities. Please contact us to discuss your requirements.
Customising Tag branding
Customising Tag branding
Why brand your Tag?
People are rightfully wary of internet based pages which they have not encountered before. It sometimes helps response rates if your customers can see your own branding associated with the response page. We provide a premium service to enable you to incorporate your brand into your response page and your member pages.
Preparing your brand images
To brand your Tag, please contact us, and we will begin the process to enable this facility for your account. We propose that you incorporate your logo with a simple strapline about ‘listening’ or ‘improvement’ or ‘feedback’. You will need two brand images. The first needs to be 232 pixels wide and 65 pixels deep, and will replace the Inspirometer logo in the response page (A). The second needs to be 273 pixels wide and 61 Pixels deep and will sit atop the left hand menu on the pages in your users accounts (B). You may need to experiment with transparency on these images, particularly around how much of the blue border on the response page you wish to show through your logo – the images below will help you with this.
![]()
Continue to Viewing Compiler Data